TableRow TableLayout table row add delete remove removeview addview Android example
TableRow TableLayout table row add delete remove removeview addview get table row index indexOfChild create table row dynamically TextView dynamically Android example
Main.java
main.xml ScrollView, TableLayout, TableRow, TextView Android xml layout example
Main.java
TableLayout table = (TableLayout)findViewById(R.id.table);
TableRow row = (TableRow)findViewById(R.id.row);

// get table row index android.
int nIndex = table.indexOfChild(row);
table.removeView(row); // invisible and height == 0
// add row into same place
table.addView(row, nIndex); // visible

// add row into certain position
table.addView(row, 3); // visible

// create new TableRow dynamically
TableRow tr = new TableRow(this);
         tr.setLayoutParams(new LayoutParams(
                        LayoutParams.FILL_PARENT,
                        LayoutParams.WRAP_CONTENT));

// create own function for append TableRow
   private void appendRow(TableLayout table) {
        TableRow row = new TableRow(this);

        TextView hLabel = new TextView(this);
        hLabel.setText("Some text");
        hLabel.setPadding(3, 3, 3, 3);

        TextView hNextLabel = new TextView(this);
        hNextLabel.setText("Next text");
        hNextLabel.setPadding(3, 3, 3, 3);
        hNextLabel.setGravity(Gravity.RIGHT | Gravity.TOP);

        row.addView(hLabel, new TableRow.LayoutParams(1));
        row.addView(hNextLabel, new TableRow.LayoutParams());

        table.addView(row, new TableLayout.LayoutParams());
    }
main.xml ScrollView, TableLayout, TableRow, TextView Android xml layout example
<ScrollView xmlns:android="//schemas.android.com/apk/res/android"
            android:layout_width="fill_parent"
            android:layout_height="fill_parent">
    <TableLayout
                android:id="@+id/table"
                  android:layout_width="fill_parent"
                 android:layout_height="fill_parent">
        <TableRow>
            <TextView android:layout_width="wrap_content"
                      android:layout_height="wrap_content"
                      android:text="Row index 0"/>
        </TableRow>
        <TableRow android:id="@+id/row">
            <TextView android:layout_width="wrap_content"
                      android:layout_height="wrap_content"
                      android:text="Row index 1"/>
        </TableRow>
        <TableRow>
            <TextView android:layout_width="wrap_content"
                      android:layout_height="wrap_content"
                      android:text="Row index 2"/>
        </TableRow>
        <TableRow>
            <TextView android:layout_width="wrap_content"
                      android:layout_height="wrap_content"
                      android:text="Row index 3"/>
        </TableRow>
		</TableLayout>
</ScrollView>
396LW NO topic_id
AD
Další témata ....(Topics)
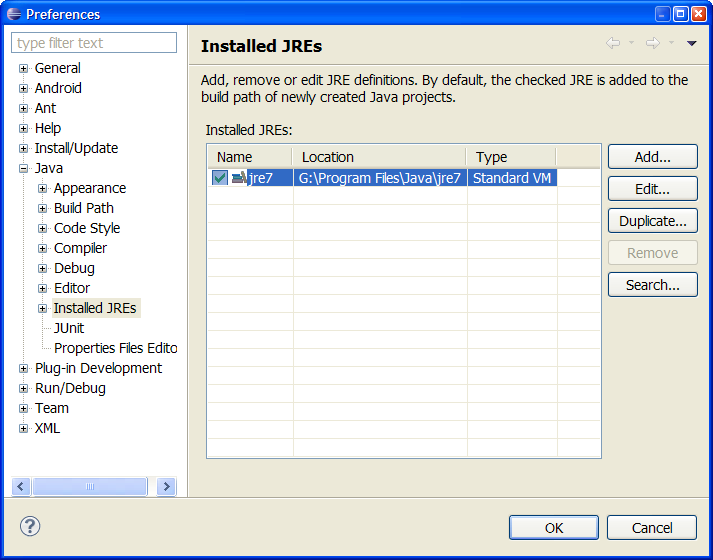
Eclipse Error: The container JRE System Library JavaSE references non existing library QTJava.zip
Workaround:
Windows->Preferences->Java->Installed JRE
Press Add and select your JRE folder path for example:
c:\Program Files\Java\jre7\
and check your choice.

Workaround:
Windows->Preferences->Java->Installed JRE
Press Add and select your JRE folder path for example:
c:\Program Files\Java\jre7\
and check your choice.

Spinner, ArrayAdapter, setOnItemSelectedListener, onItemSelected, setDropDownViewResource
MainClass.java
strings.xml
MainClass.java
public class Vypocet extends Activity {
 Spinner   hSpinnerMetry;
// .......
    @Override
    public void onCreate(Bundle savedInstanceState) {
        super.onCreate(savedInstanceState);

	       hSpinnerMetry = (Spinner) findViewById(R.id.idSpinnerMetry);
	        ArrayAdapter<CharSequence> adapterMetry = ArrayAdapter.createFromResource(
	        		this, R.array.metry_array, android.R.layout.simple_spinner_item);
	        adapterMetry.setDropDownViewResource(android.R.layout.simple_spinner_dropdown_item);
	        hSpinnerMetry.setAdapter(adapterMetry);

	           hSpinnerMetry.setOnItemSelectedListener(
	                    new OnItemSelectedListener() {
	                        public void onItemSelected(
	                                AdapterView<?> parent, View view, int position, long id) {
	                        int nPos = position;
	                        }

	                        public void onNothingSelected(AdapterView<?> parent) {

	                        }
	                    });

      }
}
strings.xml
<string-array name="metry_array">
<item>m</item>
<item>dm</item>
<item>cm</item>
<item>mm</item>
</string-array>
Google Android example source code - is text changed in EditText ?
EditText hEditText;

// TextChanged in onCreate

hEditText = (EditText)findViewById(R.id.idEditText);

hEditText.addTextChangedListener(new TextWatcher() {

	public void afterTextChanged(Editable str) {

	}


	public void beforeTextChanged(CharSequence s, int start, int count,

			int after) {

	}


	public void onTextChanged(CharSequence sq, int start, int before,

			int count) {

	}

});(Our software)
| 1 | Samsung Galaxy S2 | 13.8% (1,232) |
| 2 | Samsung Galaxy S | 8.5% (762) |
| 3 | Samsung Galaxy Tab | 7.4% (659) |
| 4 | Samsung Galaxy Mini | 5.4% (483) |
| 5 | Samsung Galaxy S | 4.0% (356) |
| 6 | HTC Desire HD | 3.8% (341) |
| 7 | Samsung Galaxy Ace | 3.8% (339) |
| 8 | HTC Wildfire | 3.2% (286) |
| 9 | Samsung Galaxy Fit | 3.1% (274) |
| 10 | SEMC Xperia X10 | 2.1% (190) |
package cz.okhelp.surfview;

import android.os.Bundle;
import android.app.Activity;
import android.content.Context;
import android.graphics.Bitmap;
import android.graphics.BitmapFactory;
import android.graphics.Canvas;
import android.view.Menu;
import android.view.MotionEvent;
import android.view.SurfaceHolder;
import android.view.SurfaceView;
import android.view.View;
import android.view.View.OnTouchListener;

public class MainActivity extends Activity implements OnTouchListener {
	OurView v;
	Bitmap ball, blob;
	float x, y;
	Sprite sprite;

	@Override
	protected void onCreate(Bundle savedInstanceState) {
		super.onCreate(savedInstanceState);
		// setContentView(R.layout.activity_our_view);
		v = new OurView(this);
		v.setOnTouchListener(this);
		ball = BitmapFactory.decodeResource(getResources(), R.drawable.ic_launcher);
		x = y = 0;
		setContentView(v);
	}


	@Override
	protected void onPause() {
		// TODO Auto-generated method stub
		super.onPause();
		v.pause();
	}

	@Override
	protected void onResume() {
		// TODO Auto-generated method stub
		super.onResume();
		v.resume();
	}

	public class OurView extends SurfaceView implements Runnable {
		Thread t = null;
		SurfaceHolder holder;
		boolean isItOK = false;

		public OurView(Context context) {
			super(context);
			// TODO Auto-generated constructor stub
			holder = getHolder();
		}

		public void run() {
			// TODO Auto-generated method stub
			while (isItOK == true) {
				// perform canvas drawing
				if (!holder.getSurface().isValid()) {
					continue;
				}
				// sprite = new Sprite(OurView.this,blob);
				Canvas c = holder.lockCanvas();
				c.drawARGB(255, 100, 100, 10);
				c.drawBitmap(ball, x, y, null);
				// onDraw(c);
				holder.unlockCanvasAndPost(c);
			}
		}

		protected void onDraw(Canvas canvas) {
			// sprite.onDraw(canvas);
		}

		public void pause() {
			isItOK = false;
			while (true) {
				try {
					t.join();
				} catch (InterruptedException e) {
					// TODO: handle exception
					e.printStackTrace();
				}
				break;
			}// end while
		}

		public void resume() {
			isItOK = true;
			t = new Thread(this);
			t.start();
		}
	}

	@Override
	public boolean onTouch(View v, MotionEvent event) {
		// TODO Auto-generated method stub
		try {
			Thread.sleep(50);
		} catch (InterruptedException e) {
			// TODO Auto-generated catch block
			e.printStackTrace();
		}
		switch (event.getAction()) {
		case MotionEvent.ACTION_DOWN:
			x = event.getX();
			y = event.getY();

			break;
		case MotionEvent.ACTION_UP:
			x = event.getX();
			y = event.getY();

			break;
		case MotionEvent.ACTION_MOVE:
			x = event.getX();
			y = event.getY();

			break;
		}// end switch

		return true;
	}

}
Editace: 2011-09-18 08:32:50
Počet článků v kategorii: 396
Url:tablerow-tablelayout-table-row-add-delete-remove-removeview-addview-android-example


