How update View TextView with timer Android runnable example
Update TextView by runnable. Handler, runnable, timer Android example.
main.xml
public class TimerActivity extends Activity {
TextView hTextView;
Button hButton, hButtonStop;
private Handler mHandler = new Handler();
private int nCounter = 0;
@Override
    public void onCreate(Bundle savedInstanceState) {
        super.onCreate(savedInstanceState);
        setContentView(R.layout.main);
        hTextView = (TextView)findViewById(R.id.idTextView);
        hButton = (Button)findViewById(R.id.idButton);
        hButton.setOnClickListener(mButtonStartListener);
        hButtonStop = (Button)findViewById(R.id.idButtonStop);
        hButtonStop.setOnClickListener(mButtonStopListener);
    } // end onCreate

View.OnClickListener mButtonStartListener = new OnClickListener() {
	public void onClick(View v) {
		try {
			mHandler.removeCallbacks(hMyTimeTask);
         //        Parameters
         //        r  The Runnable that will be executed.
         //        delayMillis  The delay (in milliseconds) until the Runnable will be executed.
                       mHandler.postDelayed(hMyTimeTask, 1000); // delay 1 second
		} catch (Exception e) {
			// TODO Auto-generated catch block
			e.printStackTrace();
		}
	}
};


private Runnable hMyTimeTask = new Runnable() {
	   public void run() {
		   nCounter++;
	    	   hTextView.setText("Hallo from thread counter: " + nCounter);
	   }
	};
/**
 *
 */
    View.OnClickListener mButtonStopListener = new OnClickListener() {
    	public void onClick(View v) {
    		 mHandler.removeCallbacks(hMyTimeTask);

    	}
    };
}
main.xml
<?xml version="1.0" encoding="utf-8"?>

<LinearLayout xmlns:android="//schemas.android.com/apk/res/android"
    android:orientation="vertical"
    android:layout_width="fill_parent"
    android:layout_height="fill_parent"
    >
<TextView
	android:id="@+id/idTextView"
    android:layout_width="fill_parent"
    android:layout_height="wrap_content"
    android:text="@string/hello"
    />
<Button android:text="Button"
android:id="@+id/idButton"
android:layout_width="wrap_content"
android:layout_height="wrap_content"></Button>

 <Button android:layout_width="wrap_content"
 android:layout_height="wrap_content"
 android:id="@+id/idButtonStop"
 android:text="Stop"></Button>


</LinearLayout>
396LW NO topic_id
AD
Další témata ....(Topics)
Tutoriál je pro naprosté začátečníky s fragmenty, machři se nic nového nedozvědí.
Tutoriál se bude zabývat upozorněním na některé záludnosti v příkladu, jenž si pozorně pročtěte, a
který si můžete otevřít a stáhnout zde:
https://developer.android.com/training/basics/fragments/creating.html
Je tam i zip soubor, který si stáhněte a otevřete v Android Studiu (JetBrains IntelliJ IDEA software),
či jiném IDE, které používáte k programování.
Začneme soubory XML
V příkladu jsou v res složce dvě složky layout.
layout - pro obrazovky chytrých telefonů a
layout-large - pro obrazovky tabletů a větších obrazovek
V složce layout jsou dva soubory.
article_view.xml je v tomto případě vždy využíván fragmentem ArticleFragment.java, který zobrazuje obsah. Je jedno jaká bude velikost obrazovky, protože si jej otevírá ArticleFragment.java sám.
Obě složky obsahují soubor stejného názvu news_articles.xml - který obsahuje kontejner buď jen pro jeden panel (layout složka),
nebo pro dva panely (layout-large složka) pro velké obrazovky.
news_articles.xml v layout složce obsahuje jen FrameLayout
news_articles.xml v layout-large složce obsahuje dva kontainery tagu fragment s plnou cestou k souboru např. com.example.android.fragments.HeadlinesFragment,
u kterých není možná dynamická výměna fragmentu!!!!
Tutoriál se bude zabývat upozorněním na některé záludnosti v příkladu, jenž si pozorně pročtěte, a
který si můžete otevřít a stáhnout zde:
https://developer.android.com/training/basics/fragments/creating.html
Je tam i zip soubor, který si stáhněte a otevřete v Android Studiu (JetBrains IntelliJ IDEA software),
či jiném IDE, které používáte k programování.
Important: Protože Android Studio má celkem dost značné nároky na PC, zejména na rychlost a budete si chtít pořídit nové PC, je třeba s procesorem Intel a nekupovat repas, ale vše v novotě. Doporučované minimum je nedostatečné a práce na takovém PC je horor. Dole na stránce odkazu je uveden typ procesoru, který by mělo PC mít, jinak na něm nespustíte, nebo jen s obtížemi, emulátor, na kterém se testují vytvářené aplikace.
Například pro rok 2016 jsou požadavky na procesor:
For accelerated emulator: 64-bit operating system and Intel® processor with support for Intel® VT-x, Intel® EM64T (Intel® 64), and Execute Disable (XD) Bit functionality
Začneme soubory XML
V příkladu jsou v res složce dvě složky layout.
layout - pro obrazovky chytrých telefonů a
layout-large - pro obrazovky tabletů a větších obrazovek
V složce layout jsou dva soubory.
article_view.xml je v tomto případě vždy využíván fragmentem ArticleFragment.java, který zobrazuje obsah. Je jedno jaká bude velikost obrazovky, protože si jej otevírá ArticleFragment.java sám.
Obě složky obsahují soubor stejného názvu news_articles.xml - který obsahuje kontejner buď jen pro jeden panel (layout složka),
nebo pro dva panely (layout-large složka) pro velké obrazovky.
Important:
Složku layout-large lze přejmenovat na swXXXdp např. sw600dp a pak si zařízení bere automaticky resource z této složky, pokud nejmenší rozměr obrazovky je roven, či větší 600dp.
To lze využít k oklamání zařízení při testování. Pokud máte jen malý telefon a chcete na něm zkoušet dva panely, tak složku přejmenujte, po dobu testování, např. na sw300dp a pak i malé zařízení zobrazí oba panely. Po ukončení testování je třeba zase složku přejmenovat na původní nejmenší přípustnou šířku zařízení (w600dp), nebo nejmenší rozměr jedné ze stran obrazovky (sw600dp).
news_articles.xml v layout složce obsahuje jen FrameLayout
<FrameLayout xmlns:android="//schemas.android.com/apk/res/android"
    android:id="@+id/fragment_container"
    android:layout_width="match_parent"
    android:layout_height="match_parent" />
Important: U tohoto kontaineru -FrameLayout- je možno měnit obsah, tedy dynamicky vyměnit fragment za jiný! Toho využívá aplikace u malých obrazovek pro zobrazení jak seznamu, tak i dalšího obsahu po kliknutí na položku v ListView - seznamu.
U fragment kontaineru s natvrdo přiřazeným fragmentem dynamická výměna za běhu programu není možná (viz níže dva kontainery tagu fragment)!!!
news_articles.xml v layout-large složce obsahuje dva kontainery tagu fragment s plnou cestou k souboru např. com.example.android.fragments.HeadlinesFragment,
u kterých není možná dynamická výměna fragmentu!!!!
Important: Pokud chcete měnit fragmenty v některém kontaineru, je třeba použít FrameLayout kontainer!!!!
    <fragment android:name="com.example.android.fragments.HeadlinesFragment"
              android:id="@+id/headlines_fragment"
              android:layout_weight="1"
              android:layout_width="0dp"
              android:layout_height="match_parent" />

    <fragment android:name="com.example.android.fragments.ArticleFragment"
              android:id="@+id/article_fragment"
              android:layout_weight="2"
              android:layout_width="0dp"
              android:layout_height="match_parent" />
Important: Na co si ještě dát pozor!!!!
Na android:layout_width="0dp" - musí být 0dp, jinak se např. některý panel nezobrazí, nebo neuvídíte vůbec nic.
Podobně i android:layout_weight="1" u prvního panelu android
android:layout_weight="2" u panelu druhého!!!!!
Add and shuffle elements in LinkedList or ArrayList Java basic example.
import java.util.Collections;
import java.util.LinkedList;
import java.util.List;

public class MainClass {
	public static void main(String[] arg) {
		String[] arrayOfString = {"nothing", "Hello", "people"
				, "bye-bye", "hello", "world!", "End" };
		   List<String> arrayList = new LinkedList<String>();
            for(String s: arrayOfString)
		     arrayList.add(s);

		    Collections.shuffle(arrayList);

		    System.out.println(arrayList);

		  }
}
/*
[hello, world!, bye-bye, nothing, people, End, Hello]
*/
Eclipse: failed to create the java virtual machine - message box
- Open folder with Eclipse.exe and find eclipse.ini file
- Replace -vmargs
by your current real path of javaw.exe:
-vm "c:\Program Files\Java\jdk1.7.0_07\bin\javaw.exe"
-startup
plugins/org.eclipse.equinox.launcher_1.3.0.v20120522-1813.jar
--launcher.library
plugins/org.eclipse.equinox.launcher.win32.win32.x86_1.1.200.v20120522-1813
-product
com.android.ide.eclipse.adt.package.product
--launcher.XXMaxPermSize
256M
-showsplash
com.android.ide.eclipse.adt.package.product
--launcher.XXMaxPermSize
256m
--launcher.defaultAction
openFile
-vm "c:\Program Files\Java\jdk1.7.0_07\bin\javaw.exe”
-Dosgi.requiredJavaVersion=1.6
-Xms40m
-Xmx768m
-Declipse.buildId=v21.1.0-569685
Issue:
ActivityThread: Failed to find provider
Try check this authority tags if they are all the same:
(com.yourdomen.yourproject.YourContentProviderClass replace your path to YourContentProviderClass)
res/xml/serchable.xml
Tag searchable
AndroidManifest.xml
Tag provider
ActivityThread: Failed to find provider
Try check this authority tags if they are all the same:
(com.yourdomen.yourproject.YourContentProviderClass replace your path to YourContentProviderClass)
res/xml/serchable.xml
Tag searchable
<searchable xmlns:android="//schemas.android.com/apk/res/android"
android:blahblah
......
android:searchSuggestAuthority="com.yourdomen.yourproject.YourContentProviderClass"
AndroidManifest.xml
Tag provider
 <provider android:name=".YourContentProviderClass"
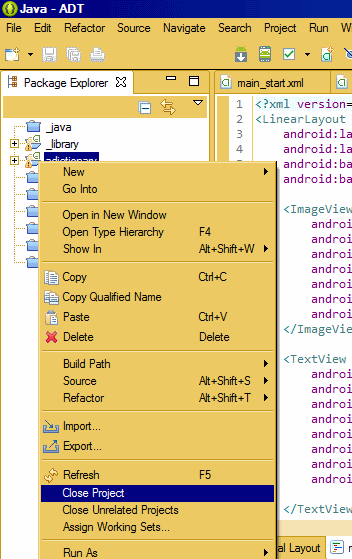
android:authorities="com.yourdomen.yourproject.YourContentProviderClass" />Close one project:¨
-right click on project
- select Close project
Close more projects:
- right click on project
- select Close Unrelated Projects
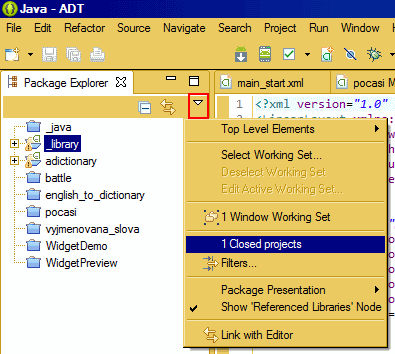
Hide closed projects:
- package explorer
- view menu
- select Closed projects


-right click on project
- select Close project
Close more projects:
- right click on project
- select Close Unrelated Projects
Hide closed projects:
- package explorer
- view menu
- select Closed projects


Editace: 22.5.2020 - 17:00
Počet článků v kategorii: 396
Url:how-update-view-textview-with-timer-android-runnable-example


