How get Android SDK location on PC with Eclipse
How get Android SDK location - PATH on PC from Eclipse tutorial.
- Open dialog from menu Window -> AVD and SDK manager
- In dialog select Available packages
- On top of dialog will displayed similar path: SKD Location: C:\PROGRA~1\Android\android-sdk-windows\
396LW NO topic_id
AD
Další témata ....(Topics)
If project is in workspace and only not visible in project explorer using this:
Click on some project in project explorer
Menu:
File
Import project
Existing Projects into Workspace
- create new folder with values in resources folder in project with extension your language code
For example:
My language is Czech (cs)
I have to create the folder values-cs in res folder
Into every values folder put strings.xml file
Translate every string from values folder into your locale.
If user selected your locale in device settings, application selects a string from the correct (proper) folder.
For example:
My language is Czech (cs)
I have to create the folder values-cs in res folder
// for locale English is default
/MyProject/res/values
<?xml version="1.0" encoding="utf-8"?>
<resources>

    <string name="app_name">App English default</string>
    <string name="action_settings">Settings English default</string>
    <string name="hello_world">Hello world</string>

</resources>

// for locale Czech (cs)
/MyProject/res/values-cs
<?xml version="1.0" encoding="utf-8"?>
<resources>

    <string name="app_name">Aplikace česky cs</string>
    <string name="action_settings">Nastavení česky</string>
    <string name="hello_world">Ahoj světe!</string>

</resources>

// for locale English US (r is region)
/MyProject/res/values-en-rUS

<?xml version="1.0" encoding="utf-8"?>
<resources>

    <string name="app_name">App English Us locale</string>
    <string name="action_settings">Settings English Us locale</string>
    <string name="hello_world">Hello world from USA :)</string>

</resources>
Into every values folder put strings.xml file
Translate every string from values folder into your locale.
If user selected your locale in device settings, application selects a string from the correct (proper) folder.
Try this solution:
AdView adView = new AdView(getApplicationContext());//in menu inflater getActivity()
adView.setAdUnitId("ca-app-pub-87***yourNumber");
adView.setAdSize(AdSize.BANNER);
LinearLayout linLay = (LinearLayout)findViewById(R.id.idReklamaLayout);
// Add the adView to it
linLay.addView(adView);
// Initiate a generic request to load it with an ad
if(Build.MANUFACTURER.equals("unknown")) {
// Emulator
AdRequest.Builder.addTestDevice("B3EEABB8EE11C2BE770B684D95219ECB"); // to get test ads on this device.
AdRequest adRequest = new AdRequest.Builder()
 .addTestDevice(AdRequest.DEVICE_ID_EMULATOR)        // All emulators
 .addTestDevice("B3EEABB8EE11C2BE770B684D95219ECB")  // Emulator id you will get in the LogCat verbose
 .build();

adView.loadAd(adRequest);
	  			/* */
}else {
 // Not Emulator
// Initiate a generic request to load it with an ad
AdRequest adRequest = new AdRequest.Builder().build();
adView.loadAd(adRequest);/**/
}
WakeLock, PowerManager,uses-permission Android sample.
Main.java
AndroidManifest.xml
Main.java
public class Main extends Activity {
	    private SensorManager mSensorManager;
	    private PowerManager mPowerManager;
	    private WindowManager mWindowManager;
	    private WakeLock mWakeLock;
	    private Button button;
	    private TextView textView;

	    /** Called when the activity is first created. */
	    @Override
	    public void onCreate(Bundle savedInstanceState) {
	        super.onCreate(savedInstanceState);
try{
	        // Get an instance of the SensorManager
	        mSensorManager = (SensorManager) getSystemService(SENSOR_SERVICE);

	        // Get an instance of the PowerManager
	        mPowerManager = (PowerManager) getSystemService(POWER_SERVICE);

	        // Get an instance of the WindowManager
	        mWindowManager = (WindowManager) getSystemService(WINDOW_SERVICE);
	        mWindowManager.getDefaultDisplay();

	        // Create a bright wake lock
	        mWakeLock = mPowerManager.newWakeLock(PowerManager.SCREEN_BRIGHT_WAKE_LOCK, getClass()
	                .getName());

	        setContentView(R.layout.main);
	        textView = (TextView)findViewById(R.id.textView1);
	        button = (Button)findViewById(R.id.button1);
	        button.setOnClickListener(mButtonStopListener);


		} catch (Exception e) {
			// TODO Auto-generated catch block
			e.printStackTrace();
			Log.e("onCreate", e.getMessage());
		}
} // END onCreate

	    View.OnClickListener mButtonStopListener = new OnClickListener() {
	    	public void onClick(View v) {
		        try {
					mWakeLock.release();
					textView.setText("mWakeLock.release()");
				} catch (Exception e) {
					// TODO Auto-generated catch block
					e.printStackTrace();
					Log.e("onPause",e.getMessage());
				}

	    	}
	    };

	    @Override
	    protected void onResume() {
	        super.onResume();
	        /*
	         * when the activity is resumed, we acquire a wake-lock so that the
	         * screen stays on, since the user will likely not be fiddling with the
	         * screen or buttons.
	         */

	        try {
				mWakeLock.acquire();
				textView.setText("mWakeLock.acquire()");
			} catch (Exception e) {
				// TODO Auto-generated catch block
				e.printStackTrace();
				Log.e("onResume", e.getMessage());
			}

	    }

	    @Override
	    protected void onPause() {
	        super.onPause();

	        // and release our wake-lock
	        try {
				mWakeLock.release();
			} catch (Exception e) {
				// TODO Auto-generated catch block
				e.printStackTrace();
				Log.e("onPause",e.getMessage());
			}
	    }
}
AndroidManifest.xml
<?xml version="1.0" encoding="utf-8"?>
<manifest xmlns:android="//schemas.android.com/apk/res/android"
      package="cz.okhelp.Main"
      android:versionCode="1"
      android:versionName="1.0">
    <uses-sdk android:minSdkVersion="7" />
    <uses-permission android:name="android.permission.HARDWARE_TEST"></uses-permission>
<uses-permission android:name="android.permission.VIBRATE"></uses-permission>

<uses-permission android:name="android.permission.WAKE_LOCK"></uses-permission>

    <application android:icon="@drawable/icon" android:label="@string/app_name">
        <activity android:name=".ScreenBrightnessActivity"
                  android:label="@string/app_name">
            <intent-filter>
                <action android:name="android.intent.action.MAIN" />
                <category android:name="android.intent.category.LAUNCHER" />
            </intent-filter>
        </activity>

    </application>
</manifest>
If you want download some *.apk file from internet and try on your emulator you get error than you have to install SD card. You have to closing Android emulator.
Mount Android emulator SD card instruction
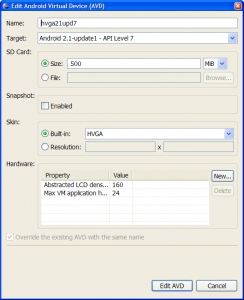
Image how install SD card on Android emulator in Eclipse.

Mount Android emulator SD card instruction
- In Eclipse go in menu Window - Android SDK and Avg Manager
- Select Virtual devices
- Select AVD Name where you need install SD card
- Click on Edit button
- In open dialog go to SD card - Size: and write 500
- Press button Edit AVD
- Run AVD emulator
Image how install SD card on Android emulator in Eclipse.
