Set Drawable programmatically Android example
// start_dark.png is stored in path	/package_name/res/drawable/start_dark.png
Drawable dw = getApplicationContext().getResources().getDrawable(R.drawable.start_dark);
Button hButtonStart = (Button)findViewById(R.id.buttonStart);
hButtonStart.setCompoundDrawablesWithIntrinsicBounds(dw, null, null, null);
396LW NO topic_id
AD
Další témata ....(Topics)
drawText(), setColor(), setTextSize(), setTextAlign()
public class ApokusActivity extends Activity {
	@Override
	protected void onCreate(Bundle savedInstanceState) {
		super.onCreate(savedInstanceState);
		setContentView(new SampleView(this));
	}

	private static class SampleView extends View {

		// CONSTRUCTOR
		public SampleView(Context context) {
			super(context);
			setFocusable(true);

		}
		@Override
		protected void onDraw(Canvas canvas) {
			Paint paint = new Paint();

            paint.setColor(Color.YELLOW);
            paint.setTextSize(60);
            //paint.setTextAlign(Paint.Align.CENTER);

            canvas.drawText("Hello world!", 0, 50, paint);
		}

	}
}
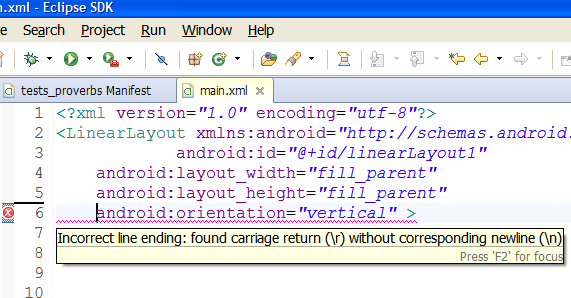
Incorrect line ending: found carriage return (\r) without corresponding newline (
)
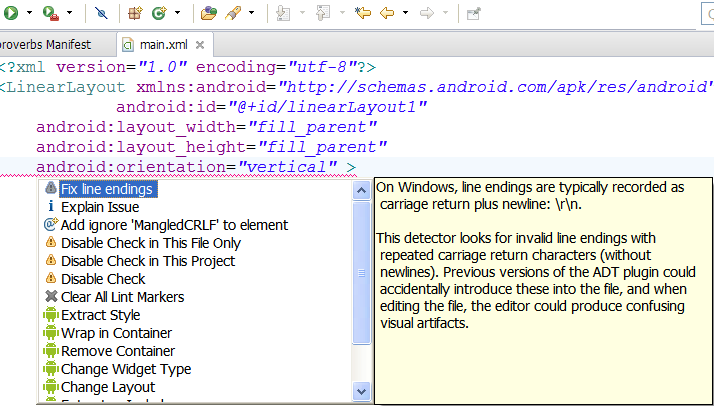
Move mouse cursor on error text and press Ctrl+1
Select Fix line endings and press Enter
See image below:


)
Move mouse cursor on error text and press Ctrl+1
Select Fix line endings and press Enter
See image below:


1.) Try delete some apps from Android emulator (can from Eclipse DDMS perspective
- File Explorer tab - data/apps folder path )
2.) Try resize emulator internal storage or SD card storage to hight size
3.)Try add to AndroidManifest.xml android:installLocation="preferExternal"
4.) Try resize particion from Eclipse
Preferences,
select Android- Launch
Add "-partition-size 1024" into "Default emulator option” field.
Click "Apply” and use your emulator as usual
- File Explorer tab - data/apps folder path )
2.) Try resize emulator internal storage or SD card storage to hight size
3.)Try add to AndroidManifest.xml android:installLocation="preferExternal"
<manifest xmlns:android="//schemas.android.com/apk/res/android"
    package="com.myweb.mypackage"
    android:installLocation="preferExternal"
4.) Try resize particion from Eclipse
Preferences,
select Android- Launch
Add "-partition-size 1024" into "Default emulator option” field.
Click "Apply” and use your emulator as usual
public class MainActivity extends Activity {

    @Override
    public void onCreate(Bundle savedInstanceState) {
        super.onCreate(savedInstanceState);
        setContentView(R.layout.main);

        LinearLayout layout = (LinearLayout) findViewById(R.id.layout);
            TextView textView = new TextView(this);
            textView.setText("Text View ");
            LinearLayout.LayoutParams p = new LinearLayout.LayoutParams(
                    LinearLayout.LayoutParams.FILL_PARENT,
                    LinearLayout.LayoutParams.WRAP_CONTENT
            );
            layout.addView(textView, p);

            Button buttonView = new Button(this);
            buttonView.setText("Button");
            buttonView.setOnClickListener(mThisButtonListener);
            layout.addView(buttonView, p);

    }
    private OnClickListener mThisButtonListener = new OnClickListener() {
        public void onClick(View v) {
            Toast.makeText(MainActivity.this, "Hello !",
                    Toast.LENGTH_LONG).show();
        }
    };
}
Editace: 2012-03-12 13:50:24
Počet článků v kategorii: 396
Url:set-drawable-programmatically-android-example


