ADT 20 Eclipse New Activity wizard cannot be complete due to support library
Issue:
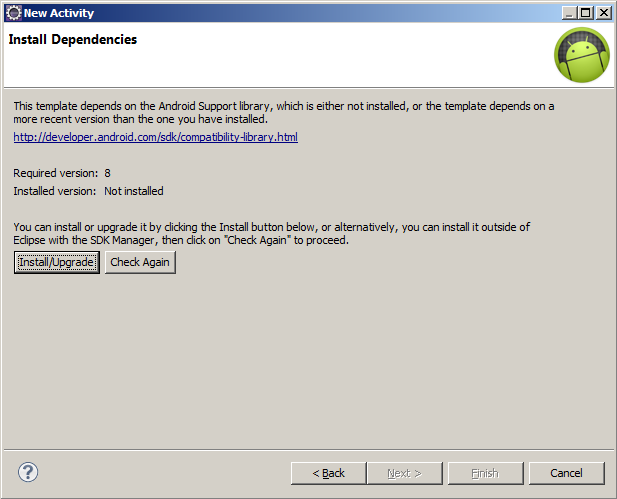
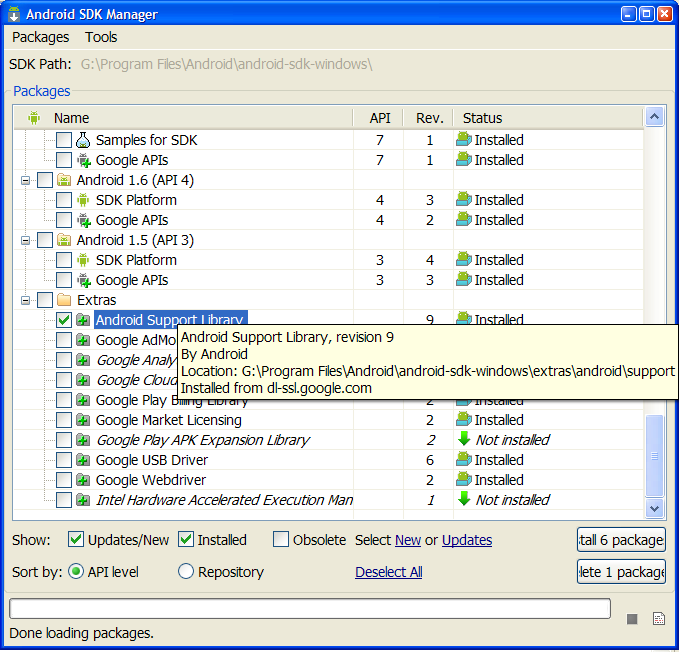
When using New Activity wizard, ADT 20 asked to install Android Support library version 8 even though version 9 has been installed.
Pressing "Install/Update" then ADT popup a window downloading Support library, when finished nothing happen.
Pressing "Check Again" does nothing.
If i restarting Eclipse again this problem.
Notice: If you install new version ADT or update via SDK Manager, open SDK Manager standalone and close Eclipse.
Workaround:
- Close Eclipse
- Open SDK Manager standalone (c:\Program Files\Android\android-sdk-windows\SDK Manager.exe)
- Check the checkbox and uninstall Extras -> Android Support Library.
- Check again Extras -> Android Support Library and install it
- Restart Eclipse
- Try to create new project


396LW NO topic_id
AD
Další témata ....(Topics)
Calendar dateOfYourBirth = new GregorianCalendar(1998, Calendar.SEPTEMBER, 17); Calendar today = Calendar.getInstance(); Android example.
public class HoriziontalScrollActivity extends Activity {
	TextView txtV;
	Context cntx;

    @Override
    public void onCreate(Bundle savedInstanceState) {
        super.onCreate(savedInstanceState);
        setContentView(R.layout.main);
        txtV = (TextView)findViewById(R.id.idLabel);
        cntx = this;
        StringBuilder strBuild = new StringBuilder();

        // enter your date of birth
        Calendar dateOfYourBirth = new GregorianCalendar(1998, Calendar.SEPTEMBER, 17);
        Calendar today = Calendar.getInstance();
        int yourAge = today.get(Calendar.YEAR) - dateOfYourBirth.get(Calendar.YEAR);
        dateOfYourBirth.add(Calendar.YEAR, yourAge);
        if (today.before(dateOfYourBirth)) {
            yourAge--;
        }
        strBuild.append("You are " + yourAge + " old!");
         txtV.setText(strBuild);
    }
}
ScrollTo(), getTop(), getBottom(), getLeft(), getRight(), ScrollView, LinearLayout Android Java xml example.
How get position of a View.
MainClass.java
main.xml
How get position of a View.
MainClass.java
/*
public void scrollTo (int x, int y)
Since: API Level 1
Set the scrolled position of your view. This will cause a call to onScrollChanged(int, int, int, int) and the view will be invalidated.

This version also clamps the scrolling to the bounds of our child.

Parameters
x  the x position to scroll to
y  the y position to scroll to
  */

// sroll to top of hscrollViewMain
ScrollView hscrollViewMain = (ScrollView)findViewById(R.id.scrollViewMain);
hscrollViewMain.scrollTo(0, 0); // scroll to application top

// get position of a View
EditText hEdit = (EditText)findViewById(R.id.username_edit);
int nY_Pos = hEdit.getTop(); // getBottom(); X_pos  getLeft(); getRight();
// scroll to top of hEdit
hscrollViewMain.scrollTo(0,nY_Pos);
main.xml
<LinearLayout
    xmlns:android="//schemas.android.com/apk/res/android"
    android:orientation="vertical"
    android:layout_width="fill_parent"
    android:layout_height="wrap_content">
    <ScrollView
        android:id="@*id/scrollViewMain"
        android:layout_width="fill_parent"
        android:layout_height="0dip"
        android:layout_weight="1">
        <LinearLayout
            android:layout_width="fill_parent"
            android:layout_height="wrap_content"
            android:layout_weight="1"
            android:orientation="vertical"
            android:paddingTop="5dip"
            android:paddingBottom="13dip"
            android:paddingLeft="20dip"
            android:paddingRight="20dip">
            <TextView
                android:id="@+id/message"
                android:textAppearance="?android:attr/textAppearanceSmall"
                android:layout_width="wrap_content"
                android:layout_height="wrap_content"
                android:layout_marginBottom="5dip" />
            <TextView
                android:textAppearance="?android:attr/textAppearanceSmall"
                android:textStyle="bold"
                android:layout_width="wrap_content"
                android:layout_height="wrap_content"
                android:text="@string/login_activity_username_label" />
            <EditText
                android:id="@+id/username_edit"
                android:singleLine="true"
                android:layout_width="fill_parent"
                android:layout_height="wrap_content"
                android:minWidth="250dip"
                android:scrollHorizontally="true"
                android:capitalize="none"
                android:autoText="false"
                android:inputType="textEmailAddress" />
        </LinearLayout>
    </ScrollView>

</LinearLayout>
      Spinner  _spin1 = (Spinner) findViewById(R.id.spinLangFirst);
      ArrayAdapter<String> adapterJazyky = new ArrayAdapter<String>(this,
              R.layout.spinner_text_layout.xml, {"one","two","etc...."});
      adapterJazyky.setDropDownViewResource(android.R.layout.simple_spinner_dropdown_item);
      _spin1.setAdapter(adapterJazyky);
spinner_text_layout.xml
<?xml version="1.0" encoding="utf-8"?>
<TextView xmlns:android="//schemas.android.com/apk/res/android"
          android:id="@+id/spinnerText"
          android:layout_width="fill_parent"
          android:layout_height="wrap_content"

         android:textSize="20sp"
/>
Show keyboard if WebView input have focus Android apps development example source code.
WebView webview;

//in onCreate

	webview = (WebView) findViewById(R.id.idWebviewPda);
	webview.getSettings().setJavaScriptEnabled(true);
	webview.loadUrl("//android.okhelp.cz");

	webview.requestFocus(View.FOCUS_DOWN);
    webview.setOnTouchListener(new View.OnTouchListener() {
        @Override
        public boolean onTouch(View v, MotionEvent event) {
            switch (event.getAction()) {
                case MotionEvent.ACTION_DOWN:
                case MotionEvent.ACTION_UP:
                    if (!v.hasFocus()) {
                        v.requestFocus();
                    }
                    break;
            }
            return false;
        }
    });
drawArc(), Canvas, Paint, setStyle()
public class MainActivity extends Activity {
	@Override
	protected void onCreate(Bundle savedInstanceState) {
		super.onCreate(savedInstanceState);
		setContentView(new SampleView(this));
	}

	private static class SampleView extends View {

		// CONSTRUCTOR
		public SampleView(Context context) {
			super(context);
			setFocusable(true);

		}

		@Override
		protected void onDraw(Canvas canvas) {

			canvas.drawColor(Color.CYAN);
			Paint p = new Paint();
			// smooths
			p.setAntiAlias(true);
			p.setColor(Color.RED);
			p.setStyle(Paint.Style.STROKE);
			p.setStrokeWidth(5);
			// opacity
			//p.setAlpha(0x80); //

			RectF rectF = new RectF(50, 20, 100, 80);
			canvas.drawOval(rectF, p);
			p.setColor(Color.BLACK);
			canvas.drawArc (rectF, 90, 45, true, p);
		}

	}
}
Editace: 2014-02-15 20:32:48
Počet článků v kategorii: 396
Url:adt-20-eclipse-new-activity-wizard-cannot-be-complete-due-to-support-library


