How to make a quick start the android emulator
Very very quick start of Android Emulator from Eclipse.
If will closed Android Emulator all data will saved on disk.
If will reopen Android Emulator, configuration and data will read from disk.
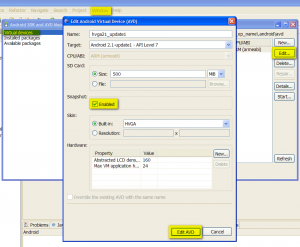
[caption id="attachment_768" align="alignleft" width="300" caption="android-emulator-enable-quick-start"] [/caption]
- Go to Eclipse s menu Window -> Android SDK and AVD Manager
- Select Virtual devices
- Select check box Snapshot: Enabled
- Press Edit AVD button.
If will closed Android Emulator all data will saved on disk.
If will reopen Android Emulator, configuration and data will read from disk.
[caption id="attachment_768" align="alignleft" width="300" caption="android-emulator-enable-quick-start"]
 [/caption]
396LW NO topic_id
AD
Další témata ....(Topics)
// Context instead Activity as a parameter
@Override
public void onAttach(Context context) {
    super.onAttach(context);

    Activity a;

    if (context instanceof Activity){
        a=(Activity) context;
    }

}
OnNoteClickedListener listener;
/* old emxample of usage
	@Override
	public void onAttach(Activity activity) {
		super.onAttach(activity);
		try {
			listener = (OnNoteClickedListener) activity;
		} catch (ClassCastException e) {
			throw new ClassCastException(activity.toString()
					+ " must implement OnNoteClickedListener");
		}
	}
*/
// new version of code
	@Override
	public void onAttach(Context context) {
		super.onAttach(context);

		Activity a;

		if (context instanceof Activity){
			a=(Activity) context;
			try {
				listener = (OnNoteClickedListener) a;
			} catch (ClassCastException e) {
				throw new ClassCastException(a.toString()
						+ " must implement OnNoteClickedListener");
			}
		}

	}
drawText(), setColor(), setTextSize(), setTextAlign()
public class ApokusActivity extends Activity {
	@Override
	protected void onCreate(Bundle savedInstanceState) {
		super.onCreate(savedInstanceState);
		setContentView(new SampleView(this));
	}

	private static class SampleView extends View {

		// CONSTRUCTOR
		public SampleView(Context context) {
			super(context);
			setFocusable(true);

		}
		@Override
		protected void onDraw(Canvas canvas) {
			Paint paint = new Paint();

            paint.setColor(Color.YELLOW);
            paint.setTextSize(60);
            //paint.setTextAlign(Paint.Align.CENTER);

            canvas.drawText("Hello world!", 0, 50, paint);
		}

	}
}
Html.fromHtml(String) does not support all HTML tags. For example < ul > and < li > are not supported.
Try this source code as a substitute for HTML List Tags.
Result:
• Cessnock
• Dubbo
• Goulburn
• Grafton
• Lithgow
• Liverpool
• Newcastle
Supported tags
a
b
big
blockquote
br
cite
dfn
div
em
font
h1-h6
i
img
p
small
strong
sub
sup
tt
u
Try this source code as a substitute for HTML List Tags.
String str =
  "•	Cessnock<br />"
 +"•	Dubbo<br />"
 +"•	Goulburn<br />"
 +"•	Grafton<br />"
 +"•	Lithgow<br />"
 +"•	Liverpool<br />"
 +"•	Newcastle<br />"
;

textview.setText(Html.fromHtml(str));
Result:
• Cessnock
• Dubbo
• Goulburn
• Grafton
• Lithgow
• Liverpool
• Newcastle
Supported tags
bla.com

a
b
big
blockquote
br
cite
dfn
div
em
font
h1-h6
i
img
p
small
strong
sub
sup
tt
u
Dialog Yes No sample code
AlertDialog.Builder builder = new AlertDialog.Builder(this);
builder.setMessage("Are you sure you want to exit application?")
       .setCancelable(false)
       .setPositiveButton("Yes", new DialogInterface.OnClickListener() {
           public void onClick(DialogInterface dialog, int id) {
                MyActivity.this.finish(); //Close  this Activity for example: MyActivity.java
           }
       })
       .setNegativeButton("No", new DialogInterface.OnClickListener() {
           public void onClick(DialogInterface dialog, int id) {
                // some code if you want
                dialog.cancel();
           }
       });
AlertDialog alert = builder.create();
alert.show();
Map TreeMap sorted by value Java Android example.
MainClass.java
MainClass.java
import java.util.Comparator;
import java.util.Map;
import java.util.Map.Entry;
import java.util.SortedSet;
import java.util.TreeMap;
import java.util.TreeSet;

public class MainClass {
	public static void main(String[] arg) {

		// english;germany dictionary
		String[] arrayOfString = { "one;eine", "two;zwei", "three;drei",
				"four;vier" };

		Map<String, String> map = new TreeMap<String, String>();

		for (String s : arrayOfString) {
			String[] array = s.split(";");
			String sKey = "", sValue = "";
			if (array.length > 1) {
				sKey = array[0];
				sValue = array[1];
				map.put(sKey, sValue);
			}
		}
		for (Entry<String, String> entry: mapSortedByValues(map)) {
		    System.out.println(entry.getKey() + " = " + entry.getValue());
		}
	}

	static <K, V extends Comparable<? super V>> SortedSet<Map.Entry<K, V>> mapSortedByValues(
			Map<K, V> map) {
		SortedSet<Map.Entry<K, V>> sortedSetOfEntries = new TreeSet<Map.Entry<K, V>>(
				new Comparator<Map.Entry<K, V>>() {
					@Override
					public int compare(Map.Entry<K, V> entry_1, Map.Entry<K, V> entry_2) {
						int res = entry_1.getValue().compareTo(entry_2.getValue());
						return res != 0 ? res : 1;
						// return entry_1.getValue().compareTo(entry_2.getValue());
					}
				});
		sortedSetOfEntries.addAll(map.entrySet());
		return sortedSetOfEntries;
	}
}
/*
three = drei
one = eine
four = vier
two = zwei
 */
Editace: 2011-09-23 08:57:10
Počet článků v kategorii: 396
Url:how-to-make-a-quick-start-the-android-emulator


