at java.util.Arrays$ArrayList.get(Arrays.java:75)
Problem in Android application:
Solution: check code for set and get selection
E/AndroidRuntime(416): FATAL EXCEPTION: main
E/AndroidRuntime(416): java.lang.IndexOutOfBoundsException
E/AndroidRuntime(416): 	at java.util.Arrays$ArrayList.get(Arrays.java:75)
E/AndroidRuntime(416): 	at android.widget.ArrayAdapter.getItem(ArrayAdapter.java:298)
E/AndroidRuntime(416): 	at android.widget.ArrayAdapter.createViewFromResource(ArrayAdapter.java:351)
E/AndroidRuntime(416): 	at android.widget.ArrayAdapter.getView(ArrayAdapter.java:323)
E/AndroidRuntime(416): 	at android.widget.Spinner.makeAndAddView(Spinner.java:192)
E/AndroidRuntime(416): 	at android.widget.Spinner.layout(Spinner.java:151)
E/AndroidRuntime(416): 	at android.widget.Spinner.onLayout(Spinner.java:115)
Solution: check code for set and get selection
// Spinner _spin1 contain only  49 items
// you can set max 48 ( range 0 - 48)
// 50 is IndexOutOfBoundsException
_spin1.setSelection(50);
396LW NO topic_id
AD
Další témata ....(Topics)
GregorianCalendar cal = new GregorianCalendar(); Boolean b = cal.isLeapYear(2012); // true, Android example.
public class MainActivity extends Activity {
TextView txtV;
	Context cntx;

    @Override
    public void onCreate(Bundle savedInstanceState) {
        super.onCreate(savedInstanceState);
        setContentView(R.layout.main);
        txtV = (TextView)findViewById(R.id.idLabel);
        cntx = this;
        StringBuilder strBuild = new StringBuilder();

         GregorianCalendar cal = new GregorianCalendar();
         Boolean b = cal.isLeapYear(2012); // true
         strBuild.append("Is leap year 2012? " + b + "

");
         b = cal.isLeapYear(2014);         // false
         strBuild.append("Is leap year 2014? " + b + "

");


         txtV.setText(strBuild);
    }
}
Try add to AndroidManifest.xml configChanges for your Activity
android:configChanges="keyboardHidden|orientation|screenSize"
android:configChanges="keyboardHidden|orientation|screenSize"
 <activity android:name=".MainActivity"
                  android:label="@string/app_name"
                  android:configChanges="keyboardHidden|orientation|screenSize"
                  >
File->Settings->Plugins and disable some plugins:
Use Emulator AVD with small memmory usage. For example: Virtual tablet with hight resolution have big memmory usage. Virtual phone with 240x320 resolution have small memmory usage.
Use instaed of Emulator, real device connected by USB (smarphone Samsung Galaxy or other recommended by Google whit debugable mode).
If you notice that Android Studio works slowly, consider the possibility to reduce the number of folders under antivirus protection.
Each antivirus check in your project consumes resources. You can significantly improve the performance, if you exclude certain folders from the antivirus protection.
- Google Cloud Testing
- Google Cloud Tools Core
- Google Cloud Tools for Android Studio
- CVS Integration
- Git Integration
- GitHub
- hg4idea
- Subversion Integration
Use Emulator AVD with small memmory usage. For example: Virtual tablet with hight resolution have big memmory usage. Virtual phone with 240x320 resolution have small memmory usage.
Use instaed of Emulator, real device connected by USB (smarphone Samsung Galaxy or other recommended by Google whit debugable mode).
If you notice that Android Studio works slowly, consider the possibility to reduce the number of folders under antivirus protection.
Each antivirus check in your project consumes resources. You can significantly improve the performance, if you exclude certain folders from the antivirus protection.
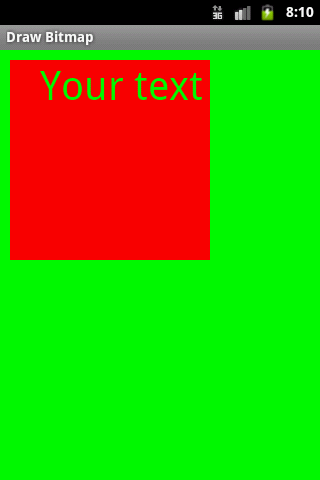
public class ApokusActivity extends Activity {

	@Override
	protected void onCreate(Bundle savedInstanceState) {
		super.onCreate(savedInstanceState);
		setContentView(new SampleView(this));
	}

	private static class SampleView extends View {

		// CONSTRUCTOR
		public SampleView(Context context) {
			super(context);
			setFocusable(true);

		}
		@Override
		protected void onDraw(Canvas canvas) {
			Paint paint = new Paint();

			canvas.drawColor(Color.GREEN);

           Bitmap b = Bitmap.createBitmap(200, 200, Bitmap.Config.ALPHA_8);
           Canvas c = new Canvas(b);
           c.drawRect(0, 0, 200, 200, paint);

           paint.setXfermode(new PorterDuffXfermode(PorterDuff.Mode.SRC));
           paint.setTextSize(40);
           paint.setTextScaleX(1.f);
           paint.setAlpha(0);
           paint.setAntiAlias(true);
           c.drawText("Your text", 30, 40, paint);
           paint.setColor(Color.RED);

           canvas.drawBitmap(b, 10,10, paint);
		}

	}
}

////www.apache.org/licenses/LICENSE-2.0
        private Paint mPaint = new Paint(Paint.ANTI_ALIAS_FLAG);
        private ColorMatrix mCM = new ColorMatrix();
        private Bitmap mBitmap;
        private float mSaturation;
        private float mAngle;
//..........
mBitmap = BitmapFactory.decodeResource(context.getResources(),
                                                   R.drawable.my_image);
//..........
        private static void setContrastScaleOnly(ColorMatrix cm, float contrast) {
            float scale = contrast + 1.f;
               float translate = (-.5f * scale + .5f) * 255.f;
            cm.set(new float[] {
                   scale, 0, 0, 0, 0,
                   0, scale, 0, 0, 0,
                   0, 0, scale, 0, 0,
                   0, 0, 0, 1, 0 });
        }
       private static void setContrast(ColorMatrix cm, float contrast) {
            float scale = contrast + 1.f;
               float translate = (-.5f * scale + .5f) * 255.f;
            cm.set(new float[] {
                   scale, 0, 0, 0, translate,
                   0, scale, 0, 0, translate,
                   0, 0, scale, 0, translate,
                   0, 0, 0, 1, 0 });
        }

        private static void setContrastTranslateOnly(ColorMatrix cm, float contrast) {
            float scale = contrast + 1.f;
               float translate = (-.5f * scale + .5f) * 255.f;
            cm.set(new float[] {
                   1, 0, 0, 0, translate,
                   0, 1, 0, 0, translate,
                   0, 0, 1, 0, translate,
                   0, 0, 0, 1, 0 });
        }

       @Override protected void onDraw(Canvas canvas) {
            Paint paint = mPaint;
            float x = 20;
            float y = 20;

            canvas.drawColor(Color.WHITE);

            paint.setColorFilter(null);
            canvas.drawBitmap(mBitmap, x, y, paint);

            ColorMatrix cm = new ColorMatrix();

            mAngle += 2;
            if (mAngle > 180) {
                mAngle = 0;
            }

            //convert our animated angle [-180...180] to a contrast value of [-1..1]
            float contrast = mAngle / 180.f;

            setContrast(cm, contrast);
            paint.setColorFilter(new ColorMatrixColorFilter(cm));
            canvas.drawBitmap(mBitmap, x + mBitmap.getWidth() + 10, y, paint);

            setContrastScaleOnly(cm, contrast);
            paint.setColorFilter(new ColorMatrixColorFilter(cm));
            canvas.drawBitmap(mBitmap, x, y + mBitmap.getHeight() + 10, paint);

            setContrastTranslateOnly(cm, contrast);
            paint.setColorFilter(new ColorMatrixColorFilter(cm));
            canvas.drawBitmap(mBitmap, x, y + 2*(mBitmap.getHeight() + 10),
                              paint);

            invalidate();
        }
    }
Editace: 2014-02-15 20:32:53
Počet článků v kategorii: 396
Url:at-java-util-arraysarraylist-getarrays-java75


