Android Fragment onAttach deprecated
// Context instead Activity as a parameter
@Override
public void onAttach(Context context) {
    super.onAttach(context);

    Activity a;

    if (context instanceof Activity){
        a=(Activity) context;
    }

}
OnNoteClickedListener listener;
/* old emxample of usage
	@Override
	public void onAttach(Activity activity) {
		super.onAttach(activity);
		try {
			listener = (OnNoteClickedListener) activity;
		} catch (ClassCastException e) {
			throw new ClassCastException(activity.toString()
					+ " must implement OnNoteClickedListener");
		}
	}
*/
// new version of code
	@Override
	public void onAttach(Context context) {
		super.onAttach(context);

		Activity a;

		if (context instanceof Activity){
			a=(Activity) context;
			try {
				listener = (OnNoteClickedListener) a;
			} catch (ClassCastException e) {
				throw new ClassCastException(a.toString()
						+ " must implement OnNoteClickedListener");
			}
		}

	}
396LW NO topic_id
AD
Další témata ....(Topics)
Failed to rename directory ....
If using for update Android SDK manager,
try close Eclipse if is open.
Or change security settings of the folder which have problem.
Or disable antivirus for a moment.
If using for update Android SDK manager,
try close Eclipse if is open.
Or change security settings of the folder which have problem.
Or disable antivirus for a moment.
Issue:
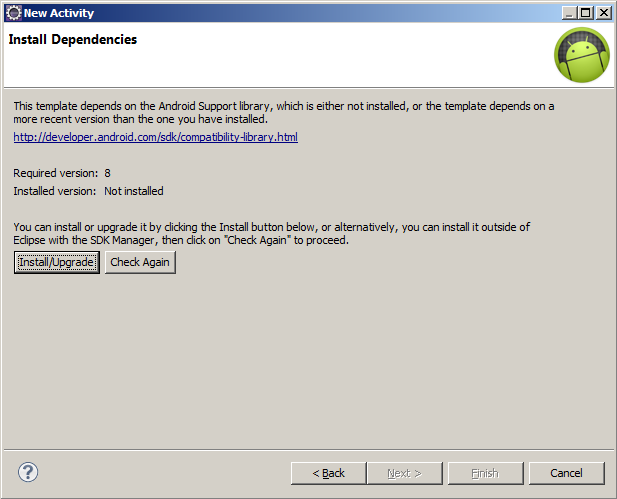
When using New Activity wizard, ADT 20 asked to install Android Support library version 8 even though version 9 has been installed.
Pressing "Install/Update" then ADT popup a window downloading Support library, when finished nothing happen.
Pressing "Check Again" does nothing.
If i restarting Eclipse again this problem.
Notice: If you install new version ADT or update via SDK Manager, open SDK Manager standalone and close Eclipse.
Workaround:
- Close Eclipse
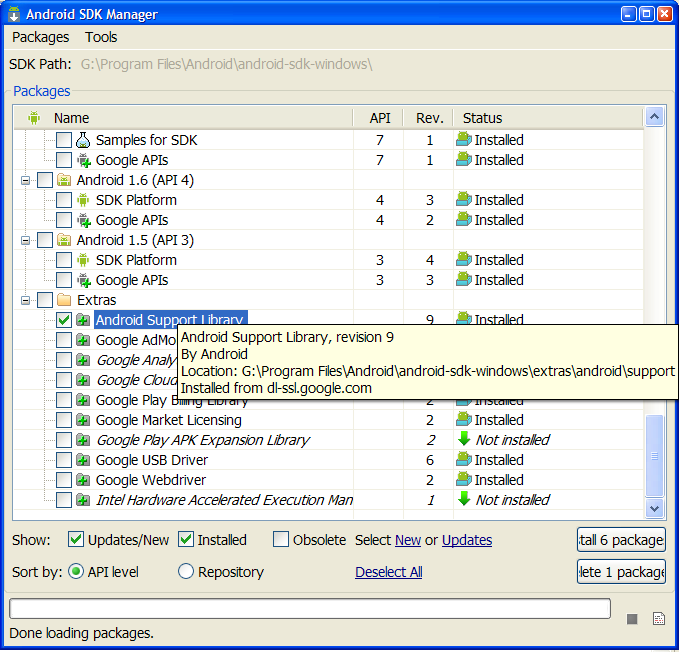
- Open SDK Manager standalone (c:\Program Files\Android\android-sdk-windows\SDK Manager.exe)
- Check the checkbox and uninstall Extras -> Android Support Library.
- Check again Extras -> Android Support Library and install it
- Restart Eclipse
- Try to create new project


drawRect(), Paint, setStroke(), setStyle(), Canvas example source code.
	@Override
	protected void onCreate(Bundle savedInstanceState) {
		super.onCreate(savedInstanceState);
		setContentView(new SampleView(this));
	}

	private static class SampleView extends View {

		// CONSTRUCTOR
		public SampleView(Context context) {
			super(context);
			setFocusable(true);

		}

		@Override
		protected void onDraw(Canvas canvas) {

			canvas.drawColor(Color.CYAN);
			Paint p = new Paint();
			// smooths
			p.setAntiAlias(true);
			p.setColor(Color.RED);
			p.setStyle(Paint.Style.STROKE);
			p.setStrokeWidth(4.5f);
			// opacity
			//p.setAlpha(0x80); //
//drawRect (float left, float top, float right, float bottom, Paint paint)
			canvas.drawRect(10, 10, 30, 30, p);
		}

	}
}
putString(), putBoolean(), putInt() etc.¨
How we can start an activity programmatically.
How we can start an activity programmatically.
// MainActivity.java
//  myButton.setOnClickListener
Intent binary = new Intent(getApplicationContext(),Calculate.class);
	Bundle b = new Bundle();
	b.putString("prvni_label", "Decimal");
	b.putString("druhy_label", "Binary");
	b.putString("mode", "binary_to_decimal");
        binary.putExtras(b);
	startActivityForResult(binary, 0);

// in Calculate.java onCreate

   TextView mTextView1 = (TextView)findViewById(R.id.textView1);
   TextView mTextView2 = (TextView)findViewById(R.id.textView2);
     Bundle _bundle = getIntent().getExtras();
		mTextView1.setText(_bundle.getString("prvni_label"));
		mTextView2.setText(_bundle.getString("druhy_label"));
//.................. HOW OPEN START NEW ACTIVITY WITHOUT A PARAMETER .........................

startActivity(new Intent(ThisActivity.this, NewActivity.class));
How set rounded corners and own styles ActivityMy.java
\res\drawable\back_button_answer.xml
Button btn.setBackgroundResource(R.drawable.back_button_answer);
\res\drawable\back_button_answer.xml
<?xml version="1.0" encoding="utf-8"?>
<shape xmlns:android="//schemas.android.com/apk/res/android" android:shape="rectangle" >
   <corners android:radius="10dip" />
   <!-- background -->

   <gradient
                android:startColor="#D6D7D6"
                android:centerColor="#E2E2E2"
                android:centerY="0.75"
                android:endColor="#D6D7D6"
                android:angle="270"
        />

   <stroke android:width="2dip" android:color="#fff"/>
</shape>
Editace: 2016-02-24 09:07:16
Počet článků v kategorii: 396
Url:android-fragment-onattach-deprecated


