Create array of strings in xml file Android example
Example source code for Android developers how create array of strings in *.xml file.
You can using array of strings in Spinner ( combobox - dropdown list ) or ListView etc.
You can using array of strings in Spinner ( combobox - dropdown list ) or ListView etc.
<resources>
    <string-array name="colors">
        <item>red</item>
        <item>orange</item>
        <item>yellow</item>
        <item>green</item>
        <item>blue</item>
    </string-array>
</resources>
396LW NO topic_id
AD
Další témata ....(Topics)
Calendar cal = new GregorianCalendar(), int year = cal.get(Calendar.YEAR),
ERA, MONTH, DAY_OF_MONTH, DAY_OF_WEEK, Android example code.
ERA, MONTH, DAY_OF_MONTH, DAY_OF_WEEK, Android example code.
public class MainActivity extends Activity {
TextView txtV;
	Context cntx;

    @Override
    public void onCreate(Bundle savedInstanceState) {
        super.onCreate(savedInstanceState);
        setContentView(R.layout.main);
        txtV = (TextView)findViewById(R.id.idLabel);
        cntx = this;
        Calendar cal = new GregorianCalendar();

     int era = cal.get(Calendar.ERA);  // 0 B.C. before Christ, 1 Anno Domini
     txtV.setText(txtV.getText() +"

" +  era);
     int year = cal.get(Calendar.YEAR);   // 2011
     txtV.setText(txtV.getText() +"

" +  year);
     int month = cal.get(Calendar.MONTH);    // 0 is Januar
     txtV.setText(txtV.getText() +"

" +  month);
     int day = cal.get(Calendar.DAY_OF_MONTH); // 1 to 31
     txtV.setText(txtV.getText() +"

" +  day);
     int dayOfWeek = cal.get(Calendar.DAY_OF_WEEK); // 1=Sunday, 2=Monday ...
     txtV.setText(txtV.getText() +"

" +  dayOfWeek);

    }
}
             ImputStream      is = this.getResources().openRawResource(R.drawable.colors);
             Bitmap    mBitmap2 = BitmapFactory.decodeStream(is);

         int  w = mBitmap2.getWidth();
         int  h = mBitmap2.getHeight();
//  int x , y have to be smaller as w , h
         int _color =  mBitmap2.getPixel(x, y);
Definition of ListView in layout main.xml file Android example
Code in Main.java ListView example source code Java Android
<ListView android:id="@+id/idListView"
        android:background="#7700CC00"
        android:layout_height="wrap_content"
        android:layout_width="fill_parent" />
Code in Main.java ListView example source code Java Android
public class Main extends Activity {
    @Override
    public void onCreate(Bundle savedInstanceState) {
        super.onCreate(savedInstanceState);
        setContentView(R.layout.main);

        ListView mlistView = (ListView) findViewById(R.id.idListView);
        mlistView.setAdapter(new ArrayAdapter<String>(this,
                android.R.layout.simple_list_item_1,
                new String[] {"Game", "Help", "Home site"}));

        mlistView.setOnItemClickListener(new OnItemClickListener() {
            public void onItemClick(AdapterView<?> parent, View view,
                int position, long id) {
              // When clicked, show a toast with the TextView text Game, Help, Home
              Toast.makeText(getApplicationContext(), ((TextView) view).getText(),
                  Toast.LENGTH_SHORT).show();
            }
          });
     }
}
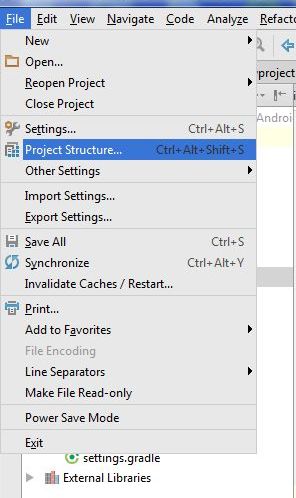
Hide module - open dialog: File > Project Structure Ctrl + Alt + Shift + S

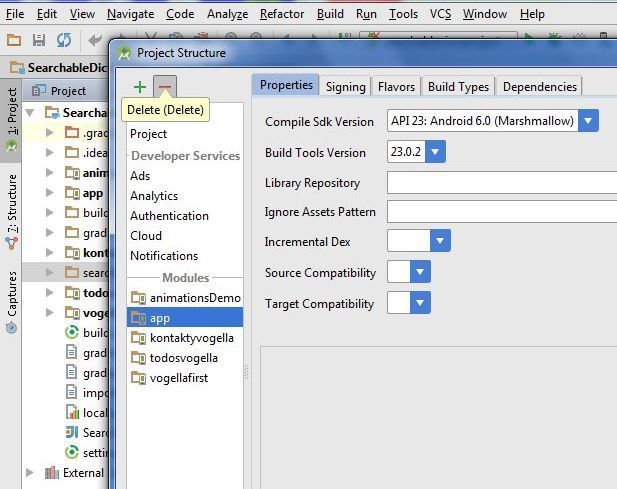
Hide module: in opened Dialog select module which will hidden and click on minus (left upper corner)

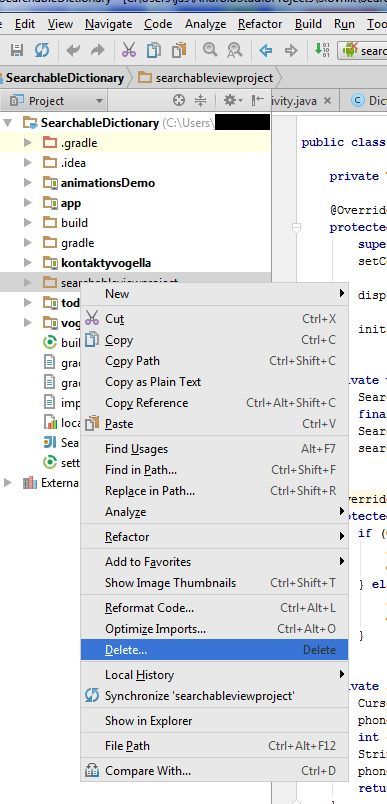
If module is hidden, you can permanetly delete module from disk. But if you want using module in future, copy module into other folder (not into AndroidProjects folder and his subbfolders) and delete module permanetly from project and disc. Right mouse click on module and select from menu Delete.

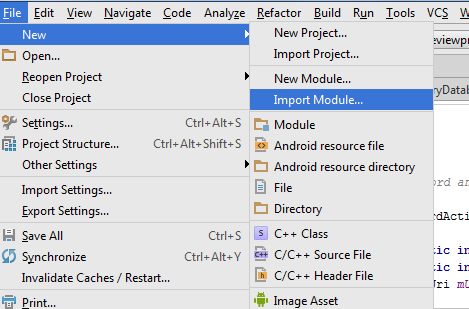
If you want import the backup copy to project, use: File>New>Import mudule


Hide module: in opened Dialog select module which will hidden and click on minus (left upper corner)

If module is hidden, you can permanetly delete module from disk. But if you want using module in future, copy module into other folder (not into AndroidProjects folder and his subbfolders) and delete module permanetly from project and disc. Right mouse click on module and select from menu Delete.

If you want import the backup copy to project, use: File>New>Import mudule

Locale lc = Locale.getDefault(); // default now locale on device
	String sCountry = lc.getCountry(); // CZ

	lc = new Locale("fr","FR"); //FRANCE .. Locale(language, country);
	String sCountry2 = lc.getDisplayCountry(); // Francie

	 Locale locale = Locale.GERMAN;
	 String sCountry3 = locale.getDisplayCountry(); // ""

 Locale locale = Locale.GERMAN;
 DateFormat formatter = new SimpleDateFormat("HH:mm:ss zzzz", locale);
 String s = formatter.format(new Date());//13:40:39 GMT+00:00


// array of locales
 Locale[] locales = { new Locale("fr", "FR"), new Locale("de", "DE"),
				        new Locale("en", "US") };


Locale locale = Locale.US;

// for date
DateFormat dateFormatterEurope = DateFormat.getDateInstance(DateFormat.DEFAULT,
					Locale.GERMANY);
Calendar myCalendar = Calendar.getInstance();
String sDate = dateFormatterEurope.format(myCalendar.getTime());

        final byte[] langBytes = locale.getLanguage().getBytes(Charsets.US_ASCII);

// UTF-8 most widely used text format for to properly display of text
        final Charset utfEncoding = Charsets.UTF_8;
        String text = "ěščřžýáíéůú";
        final byte[] textBytes = text.getBytes(utfEncoding);


// other Locale
CANADA
CANADA_FRENCH
CHINA
CHINESE
ENGLISH
FRANCE
FRENCH
GERMAN
GERMANY
ITALIAN
ITALY
JAPAN
JAPANESE
KOREA
KOREAN
PRC // Locale constant for zh_CN.
ROOT // Locale constant for the root locale.
SIMPLIFIED_CHINESE
TAIWAN
TRADITIONAL_CHINESE Locale constant for zh_TW.
UK
US
Editace: 2013-12-09 10:55:08
Počet článků v kategorii: 396
Url:create-array-of-strings-in-xml-file-android-example


