Adding TableRow add row with a View TextView dynamically to TableLayout Android sample example
Adding TableRow with a View TextView (EditText Button) programmically dynamically to TableLayout Android sample basic example.
MainClass.java
main.xml
MainClass.java
public class MainClass extends Activity {

    @Override
    public void onCreate(Bundle savedInstanceState) {
        super.onCreate(savedInstanceState);
        setContentView(R.layout.main);

        TableLayout tl = (TableLayout)findViewById(R.id.tableLayout1);
        TableRow row = new TableRow(this);
        TextView tv = new TextView(this);
        tv.setText("This is text");

        tl.addView(row);
        row.addView(tv);

    }
}
main.xml
<?xml version="1.0" encoding="utf-8"?>
<LinearLayout xmlns:android="//schemas.android.com/apk/res/android"
    android:orientation="vertical"
    android:layout_width="fill_parent"
    android:layout_height="fill_parent"
    >
<TableLayout android:layout_width="fill_parent"
    android:id="@+id/tableLayout1" android:layout_height="wrap_content">
</TableLayout>
</LinearLayout>
396LW NO topic_id
AD
Další témata ....(Topics)
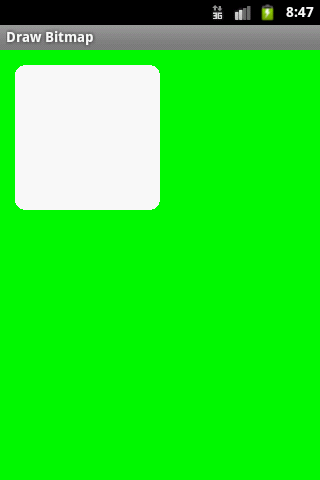
RectF, drawRoundRect(),

public class MainActivity extends Activity {

	@Override
	protected void onCreate(Bundle savedInstanceState) {
		super.onCreate(savedInstanceState);
		setContentView(new SampleView(this));
	}

	private static class SampleView extends View {

		// CONSTRUCTOR
		public SampleView(Context context) {
			super(context);
			setFocusable(true);

		}
		@Override
		protected void onDraw(Canvas canvas) {
			Paint paint = new Paint();

			canvas.drawColor(Color.GREEN);

           Bitmap b = Bitmap.createBitmap(200, 200, Bitmap.Config.ALPHA_8);
           Canvas c = new Canvas(b);
           RectF rectF = new RectF();
           rectF.set(5,5,150,150);
           c.drawRoundRect(rectF, 10, 10, paint);

            paint.setColor(Color.RED);

           canvas.drawBitmap(b, 10,10, paint);
		}

	}
}

GregorianCalendar cal = new GregorianCalendar(); Boolean b = cal.isLeapYear(2012); // true, Android example.
public class MainActivity extends Activity {
TextView txtV;
	Context cntx;

    @Override
    public void onCreate(Bundle savedInstanceState) {
        super.onCreate(savedInstanceState);
        setContentView(R.layout.main);
        txtV = (TextView)findViewById(R.id.idLabel);
        cntx = this;
        StringBuilder strBuild = new StringBuilder();

         GregorianCalendar cal = new GregorianCalendar();
         Boolean b = cal.isLeapYear(2012); // true
         strBuild.append("Is leap year 2012? " + b + "

");
         b = cal.isLeapYear(2014);         // false
         strBuild.append("Is leap year 2014? " + b + "

");


         txtV.setText(strBuild);
    }
}
How set JAVA path to Environment Variables on Windows (7)
Select Start menu > Computer > System Properties > Advanced System Settings(properties).
Then open Advanced tab > Environment Variables and add a new system variable JAVA_HOME that points to your JDK folder, for example
Select Start menu > Computer > System Properties > Advanced System Settings(properties).
Then open Advanced tab > Environment Variables and add a new system variable JAVA_HOME that points to your JDK folder, for example
C:\Program Files\Java\jdk1.8.0_05
Replace diacritic marks: Á Č Ď É Ě Í Ň Ó Ř Š Ť Ú Ů Ý Ž
á č ď é ě í ň ó ř š ť ú ů ý ž
á č ď é ě í ň ó ř š ť ú ů ý ž
public String replaceDiacritic (String inputStr) {

	Map<String, String> replacements = new LinkedHashMap<String,String>() {{
		//Velká
		put("Á","A");
		put("Č","C");
		put("Ď","D");
		put("É","E");
		put("Ě","E");
		put("Í","I");
		put("Ň","N");
		put("Ó","O");
		put("Ř","R");
		put("Š","S");
		put("Ť","T");
		put("Ú","U");
		put("Ů","U");
		put("Ý","Y");
		put("Ž","Z");
		//Malá  "," ");
		put("á","a");
		put("č","c");
		put("ď","d");
		put("é","e");
		put("ě","e");
		put("í","i");
		put("ň","n");
		put("ó","o");
		put("ř","r");
		put("š","s");
		put("ť","t");
		put("ú","u");
		put("ů","u");
		put("ý","y");
		put("ž","z");
		}
	};
	for(Map.Entry<String, String> entry : replacements.entrySet()) {
          inputStr =  inputStr.replaceAll(entry.getKey(), entry.getValue());
         }
	return inputStr;
}
xml RelativeLayout Android example:
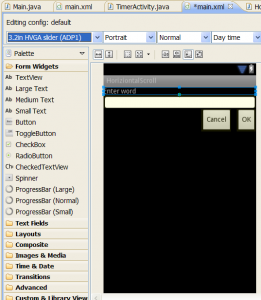
Eclipse graphical xml layout editor
[caption id="attachment_896" align="alignleft" width="261" caption="Relativelayout Eclipse graphical editor"] [/caption]
res/layout/main.xml
Eclipse graphical xml layout editor
[caption id="attachment_896" align="alignleft" width="261" caption="Relativelayout Eclipse graphical editor"]
 [/caption]
res/layout/main.xml
<?xml version="1.0" encoding="utf-8"?>
<RelativeLayout xmlns:android="//schemas.android.com/apk/res/android"
    android:layout_width="fill_parent"
    android:layout_height="fill_parent">
    <TextView
        android:id="@+id/idLabel"
        android:layout_width="fill_parent"
        android:layout_height="wrap_content"
        android:text="Enter word"/>
    <EditText
        android:id="@+id/idEntry"
        android:layout_width="fill_parent"
        android:layout_height="wrap_content"
        android:background="@android:drawable/editbox_background"
        android:layout_below="@id/idLabel"/>
    <Button
        android:id="@+id/idOk"
        android:layout_width="wrap_content"
        android:layout_height="wrap_content"
        android:layout_below="@id/idEntry"
        android:layout_alignParentRight="true"
        android:layout_marginLeft="10dip"
        android:text="OK" />
    <Button
        android:layout_width="wrap_content"
        android:layout_height="wrap_content"
        android:layout_toLeftOf="@id/idOk"
        android:layout_alignTop="@id/idOk"
        android:text="Cancel" />
</RelativeLayout>
Editace: 2011-09-22 14:17:02
Počet článků v kategorii: 396
Url:adding-tablerow-add-row-with-a-view-textview-dynamically-to-tablelayout-android-sample-example


