Start an new Activity Intent with a parameter Android example
putString(), putBoolean(), putInt() etc.¨
How we can start an activity programmatically.
How we can start an activity programmatically.
// MainActivity.java
//  myButton.setOnClickListener
Intent binary = new Intent(getApplicationContext(),Calculate.class);
	Bundle b = new Bundle();
	b.putString("prvni_label", "Decimal");
	b.putString("druhy_label", "Binary");
	b.putString("mode", "binary_to_decimal");
        binary.putExtras(b);
	startActivityForResult(binary, 0);

// in Calculate.java onCreate

   TextView mTextView1 = (TextView)findViewById(R.id.textView1);
   TextView mTextView2 = (TextView)findViewById(R.id.textView2);
     Bundle _bundle = getIntent().getExtras();
		mTextView1.setText(_bundle.getString("prvni_label"));
		mTextView2.setText(_bundle.getString("druhy_label"));
//.................. HOW OPEN START NEW ACTIVITY WITHOUT A PARAMETER .........................

startActivity(new Intent(ThisActivity.this, NewActivity.class));
396LW NO topic_id
AD
Další témata ....(Topics)
static boolean mbThemeLight = false;

 @Override
    public void onCreate(Bundle savedInstanceState) {
         if(mbThemeLight)
        setTheme(android.R.style.Theme_Light);
        super.onCreate(savedInstanceState);
        // bla bla bla..........
    }

private void switchTheme(){
 mbThemeLight = true;
 this.recreate();
}
5. Fragments Tutorial Ipsum.java – Czech language
Dil 5. Ipsum.java
V 1. dílu jsme se něco dozvěděli od XML souborech a typu procesoru pro správný běh Android Studia a emulátoru různých typů zařizení s Androidem.
V 2. dílu jsme rozebrali MainActivity.java
V 3. dílu jsme se zabývali HeadlinesFragment.java
V 4. dílu jsme se podívali na ArticleFragment.java
V tomto dílu je na řadě Ipsum.java soubor.
Používáme příklad i zip porojekt z https://developer.android.com/training/basics/fragments/creating.html
Pozorně si jej nastudujte.
package com.example.android.fragments;
/** Ipsum je veřejná třída, která obsahuje
dvě pole řetězců - stringů.
Pole Headlines slouží jako uložiště pro názvy, které
budou načteny do ListView - seznamu v HeadlinesFragment.java
Pole Articles je v našem případě zásobárnou článků, které
budou načteny dle pozice položky ListView předané z HeadlinesFragment
zoětbě do MainActivity a
odtud do ArticleFragment.java, jako parametr metody
articleFrag.updateArticleView(position);
nebo jako argument Bundle
Bundle args = new Bundle();
    args.putInt(ArticleFragment.ARG_POSITION, position);

Stringy - ukládat do souboru java je ošemetné (problémy s kódováním, vyhledávání výrazů atd.)
U většího množství článků pak nepřehledné.
Navíc, uživatel nemůže tento text editovat.
K ukládaní většího množství dat, k jejich vyhledávání
a editaci je lépe používat databáze.
*/
public class Ipsum {

    static String[] Headlines = {
        "Article One",
        "Article Two"
    };

    static String[] Articles = {
        "Article One


Excepteur pour-over occaecat squid biodiesel umami ... farm-to-table.",
        "Article Two


Vinyl williamsburg non ... synth, vegan carles odd future."
    };
}
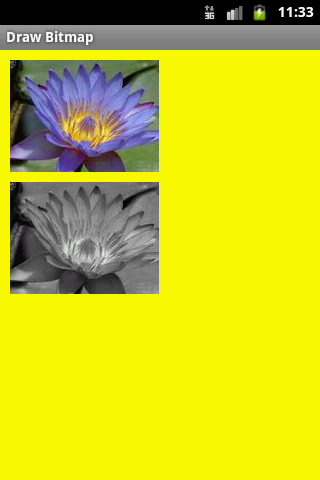
Black and white bitmap image pictures, gray scale colormatrix Android example.

public class ApokusActivity extends Activity {

	@Override
	protected void onCreate(Bundle savedInstanceState) {
		super.onCreate(savedInstanceState);
		setContentView(new SampleView(this));
	}

	private static class SampleView extends View {

		// CONSTRUCTOR
		public SampleView(Context context) {
			super(context);
			setFocusable(true);

		}

		@Override
		protected void onDraw(Canvas canvas) {
			Paint paint = new Paint();

			canvas.drawColor(Color.YELLOW);


			// you need to insert a image flower_blue into res/drawable folder

			paint.setFilterBitmap(true);
			Bitmap bitmapOrg = BitmapFactory.decodeResource(getResources(),
					R.drawable.flower_blue);
			canvas.drawBitmap(bitmapOrg, 10, 10, paint);
			int width, height;

		    ColorMatrix cm = new ColorMatrix(
		    		new float[]{
		    		0.5f,0.5f,0.5f,0,0,
		            0.5f,0.5f,0.5f,0,0,
		            0.5f,0.5f,0.5f,0,0,
		            0,0,0,1,0,0,
		            0,0,0,0,1,0
		            });
		    cm.setSaturation(0);
		    ColorMatrixColorFilter f = new ColorMatrixColorFilter(cm);
		    paint.setColorFilter(f);
		    int h = bitmapOrg.getHeight();
			//canvas.drawBitmap(bitmapOrg, 10, 10, paint);
			canvas.drawBitmap(bitmapOrg, 10, 10 + h + 10, paint);

		}

	}
}

getContext() getApplicationContext() method Java Android example source
Context myContext_1 = ThisClassName.this; // to open a Dialog

Context myContext_2 = getContext();

Context myContext_3 = this.getContext();

Context myContext_4 = this;

Context myContext_5 = this.getApplicationContext ();


	OnClickListener getImageBtnOnClick = new OnClickListener() {

		public void onClick(View view) {

			Context context = view.getContext();


		}

	};

// Toast

Toast.makeText(getApplicationContext(), "Context == getApplicationContext "

   , Toast.LENGTH_SHORT).show();


// store Context in public class

public class MyActivity extends Activity {

    public static Context myCnt = null;

    ...

    protected void onCreate(Bundle icicle) {

         ...

        myCnt = this;

        MyStorage.setContext(myCnt);

        // or

        // MyStorage.setContext(this);


        // cntxFromStorage == this

        Context cntxFromStorage = MyStorage.getContext();

        ...

        };

    };


public class MyStorage

{

    private static Context cntStorageContext = null;


    public static Context getContext() {

        return cntStorageContext;

     }


    public static void setContext(Context context) {

	 MyStorage.cntStorageContext = context;

	  }


    };


class DataBaseHelper extends SQLiteOpenHelper {

// get MyActivity context

Context cnt = MyStorage.getContext();


}
Try add to AndroidManifest.xml configChanges for your Activity
android:configChanges="keyboardHidden|orientation|screenSize"
android:configChanges="keyboardHidden|orientation|screenSize"
 <activity android:name=".MainActivity"
                  android:label="@string/app_name"
                  android:configChanges="keyboardHidden|orientation|screenSize"
                  >
Editace: 2013-01-27 22:37:38
Počet článků v kategorii: 396
Url:start-an-activity-with-a-parameter-android-example


